
DNS Management: How to Add, Edit, or Delete DNS Entries
For domains that are pointed here (using our Nameservers), you can add, edit, or delete your DNS entries in the Zone Editor, and if you're not sure which record is which or which does what, check out DNS Record Definitions for more information.
Pro Tip: Secure more than one variation of your domain to protect your brand. Register a new domain now.
Accessing the DNS Zone Editor
The first step to managing your DNS records is to access the Zone Editor. The steps vary depending on what type of account you are using:
Note: You may see a pop-up prompting you to acknowledge that these are advanced settings, and changing them comes with risk to your website and related services. Click CONTINUE to proceed to the DNS Editor.
- Log in to your Bluehost Account Manager.
- Click the Domains tab located in the left-side navigation menu.
- Scroll down and click the ˅ symbol to expand the Advanced Tools section.
- Here, you will have the option to manage the following:
- Nameservers (DNS)
- Advanced DNS Records.
- Click MANAGE next to Advanced DNS Records.
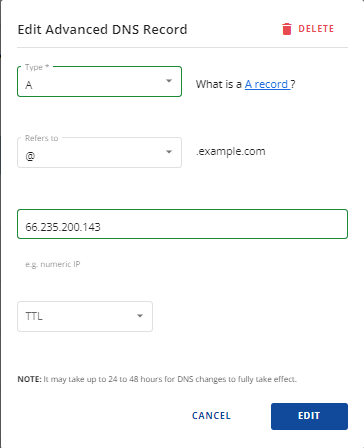
Modifying Existing DNS Record
Follow the steps below when changing or modifying an existing record after you have accessed the DNS Zone Editor. If you aren't sure which DNS Record to update, see DNS Record Definitions for more information.
Account Manager
- Under Manage Advanced DNS Records, find the record you wish to modify.
- Click the 🖉 (edit) button.

- Enter any changes you wish to make on the required fields.
- Click Edit to save changes.
Adding New Record
Follow the steps below when adding a new record after you have accessed the DNS Zone Editor.
- Click the + ADD RECORD button.
-
Fill in the required fields once the Add Advanced DNS Records pop-up appears. Additional fields may appear based on the specific record you are in the process of adding. Fill out details as instructed by the DNS record provider.
- Choose the Record Type.
- Set the TTL (time to live).
- Lastly, click on the ADD button to add the new record.
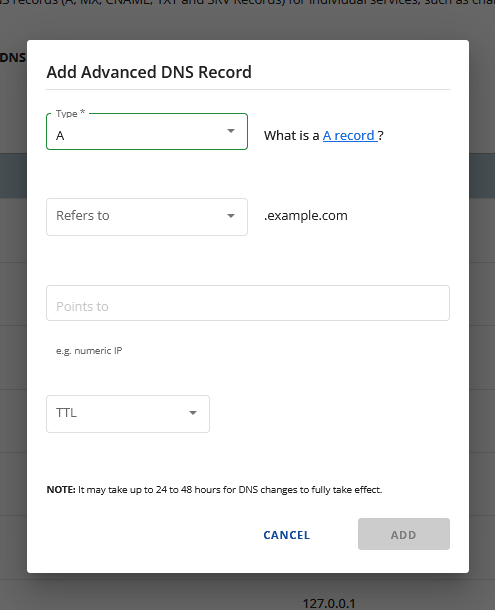
Take Note: Other fields may appear depending on the type of record you are creating. Fill out details as instructed by the DNS record provider.
Deleting Record
Follow the steps below when deleting a record after you have accessed the DNS Zone Editor.
- Under Manage Advanced DNS Records, find the record you wish to delete.
- Click the 🖉 (edit) button.
- Click the DELETE link in the top right corner.

- Finally, click the DELETE button on the confirmation window that pops up.
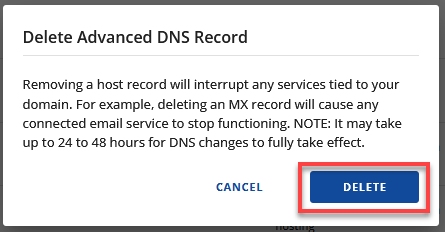
NOTE:
- Removing a host record will interrupt any services tied to your domain. For example, deleting an MX record will cause any connected email service to stop functioning.
- DNS changes may take up to 24 to 48 hours to fully take effect.
If you need further assistance, feel free to contact us via Chat or Phone:
- Chat Support - While on our website, you should see a CHAT bubble in the bottom right-hand corner of the page. Click anywhere on the bubble to begin a chat session.
- Phone Support -
- US: 888-401-4678
- International: +1 801-765-9400
You may also refer to our Knowledge Base articles to help answer common questions and guide you through various setup, configuration, and troubleshooting steps.